
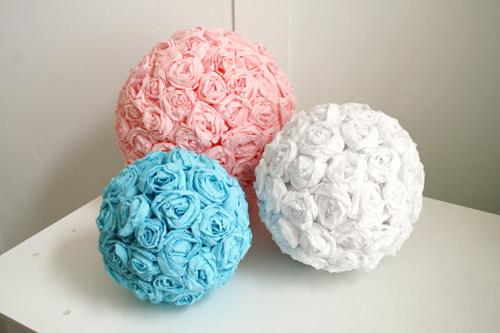
My Blue Rosette Ribbon Flower Pomanders!
 |
| Ta-Dah! |
Now, how/why did I do this? Well, you know when you think "Flower Girl," you tend to think of this...
 |
| Sweet little petal tosses |
But then I saw this picture:
And I needed to make them. Somehow, some way.
But, I knew what with all my other crazy planning/numerous DIY projects I wanted to make, that I didn't want them to serve as decor really. So BAM! The idea of having my flower girls carry them down the aisle instead of tossing petals was born! (Also, this would be a plus - not having to sweep up the petals after I slip and fall from stepping on them after the ceremony (since our venue is the same for ceremony/reception)).
Anyway here's the how to:
You will need: Lengths of ribbon, Felt squares, Hot Glue/Gun, a Styrofoam sphere, thin ribbon, beads (optional).
First, I decided on the size of each flower and used a circle template (mine was the outer rim of an old jam jar), and traced the circle into the felt squares. After cutting the squares out, take your ribbon, fold it in half, then put a hot glue bead in the center of the felt circle. Place the tip of the folded ribbon on the glue bead to secure it to the felt circle (careful - SUPER HOT!). Next, you will wrap/twist the ribbon around itself, securing with hot glue as you twist it out to the size of your liking (I did about a bead of hot glue per inch). When you've reached the outside of the circle, snip the ribbon and glue it to the underside of the felt circle. My apologies, I totally forgot to take pictures of this whole process, BAD BLOGGER! Next time I make them, (and I will --- you'll see ::sneaky wink::), I'll try to document the process better.
After adding some center beads, it will look a little something like this:
 |
| Blue Ribbon Rosette! |
Lastly, if you are making the pomander, you simple squeeze a TON of hot glue on the back of the rosette and stick them to the Styrofoam ball.


Remember to add the hanging device (small string/thin ribbon) BEFORE you finish glueing all the rosettes to the Styrofoam. That way, there will be a clean loop to hang them from or for your cute little flower girls to tote them down the aisle!
It was a lot of work. I must have made about 150 rosettes before both pomanders were done. Needless to say, my fingers were quite happy when I finished the last pomander the other day. What do you think guys? This is the second GIANT DIY I decided to take on. Are there any projects of yours that you knew would be time consuming but went ahead anyway?
All this for one inspiration picture. Jeeze. Haha!
-Micah
No comments:
Post a Comment